Want to know how to make a lyric video easily? Fed up with other complicated and lame tools?
You came to the right place.
YouTube Movie Maker built-in free and powerful Lyric Video Maker. With it, you can easy to make wonderful 2D/3D Lyrics videos with cool font types, colors, layout, words position, special effects, mask effects, particle effects, motion effects, backgrounds, videos, pictures, songs, etc.
Here we'll show you how to make a lyric video with YouTube Movie Maker step-by-step.
This tutorial will be divided into two parts. The first part is for the newbie without video making experience. You'll learn how to make a lyrics video in a few steps. The second part is aimed at experienced users. You will use full mode to make a more professional effect lyrics video.
You can also go to the lyric video maker page or our YouTube channel to see the video tutorials.
Part 1: How to make a lyric video in wizard mode
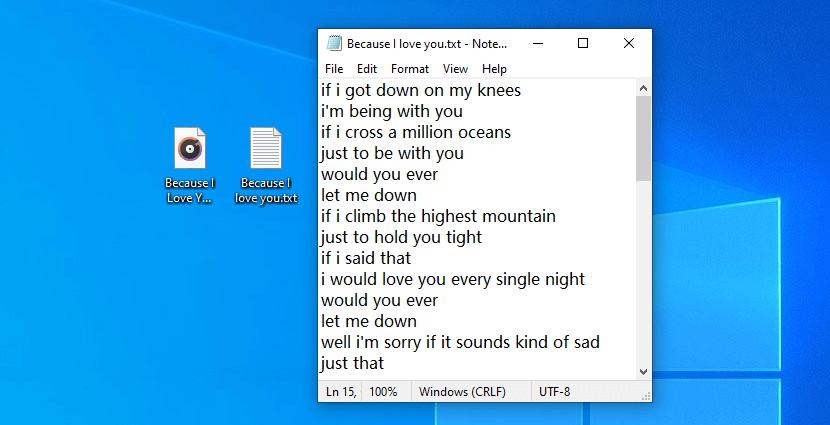
Step 0, prepare the song and lyrics file.
We need to get the song and the lyrics file ready before we start. The song file is usually an audio format such as *.MP3, the lyrics file format is *.LRC or *.TXT. If it is a *.txt file, keep each line of each lyric.
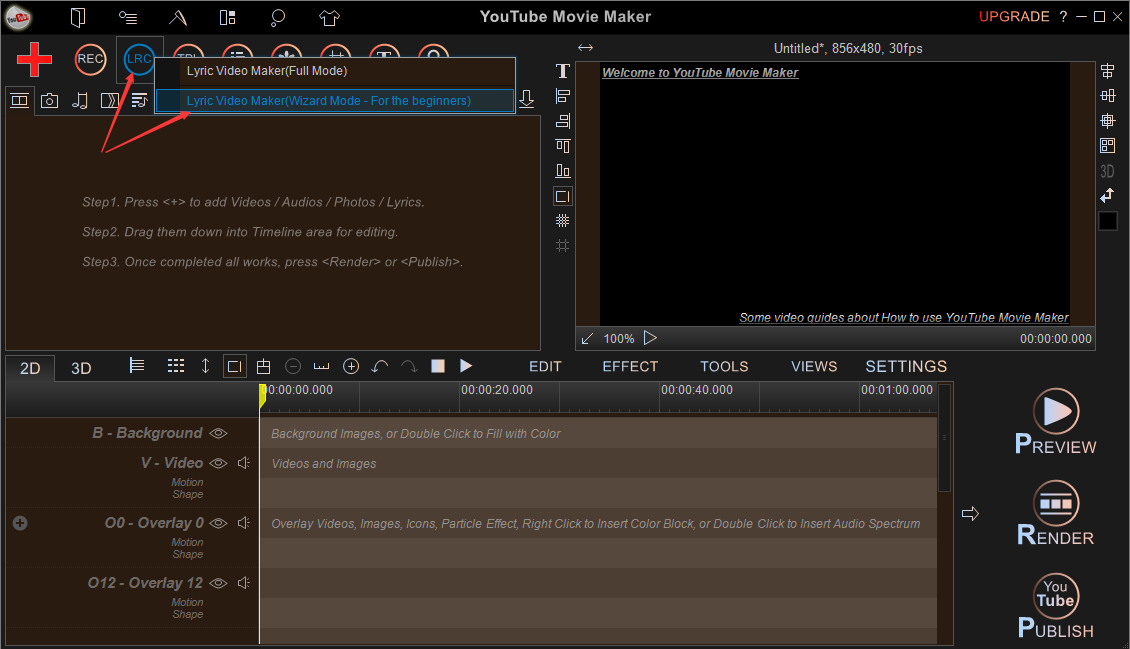
Step 1, open YouTube Movie Maker, click Lyric Video Maker (Wizard Mode) at the top of the window.
After that, you will see the lyrics video making wizard. The only thing you need to do is to follow the instructions of the wizard step-by-step. After each step, click the Next button to move on.
Step 2, import the prepared song and lyrics file.
Open the wizard mode and follow its instructions to add the song files and lyrics files that we have prepared.
There are 3 ways we can add the lyrics to the software.
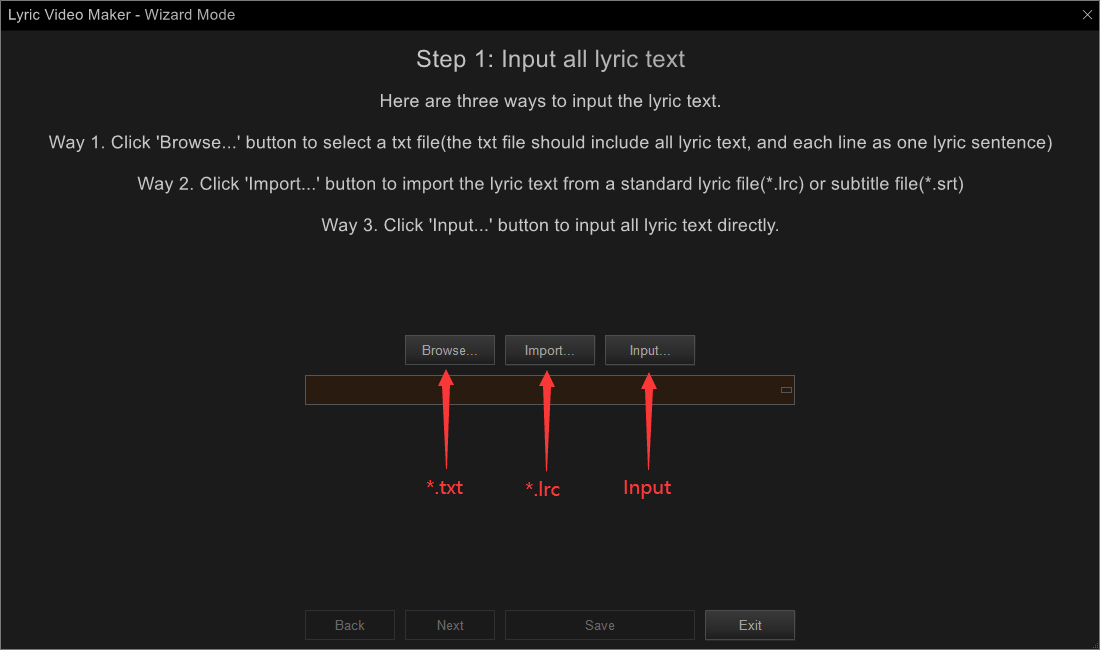
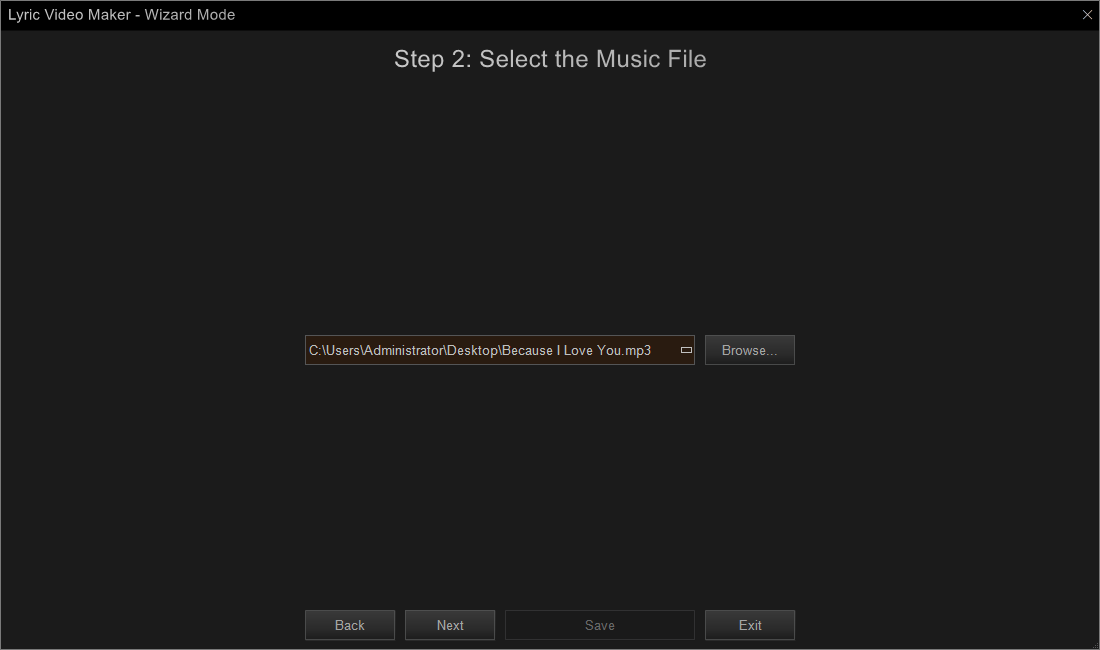
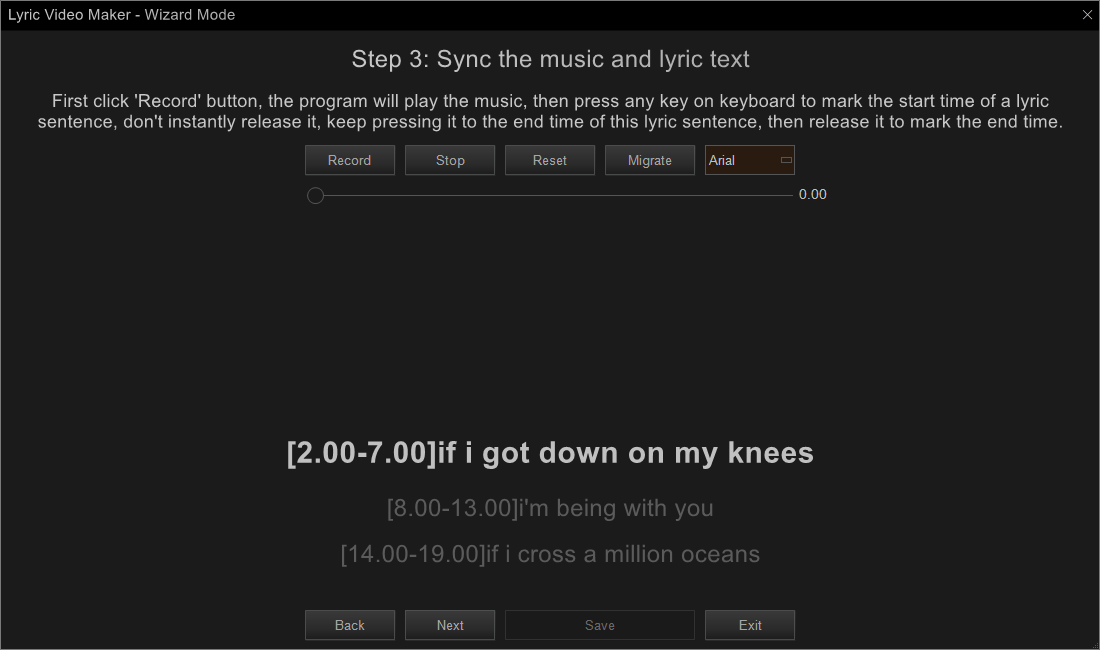
Step 3, synchronize the song and lyrics (add lyrics to the music).
After importing the files, we need to synchronize the playback progress of the song with the display of the lyrics.
Click the Record button, the software will play the song. When the music is playing, press on any key on the keyboard to record a lyric and release the key until this lyric is finished. Repeat the operation until all lyrics are recorded.
Step 4, Fine Adjustment
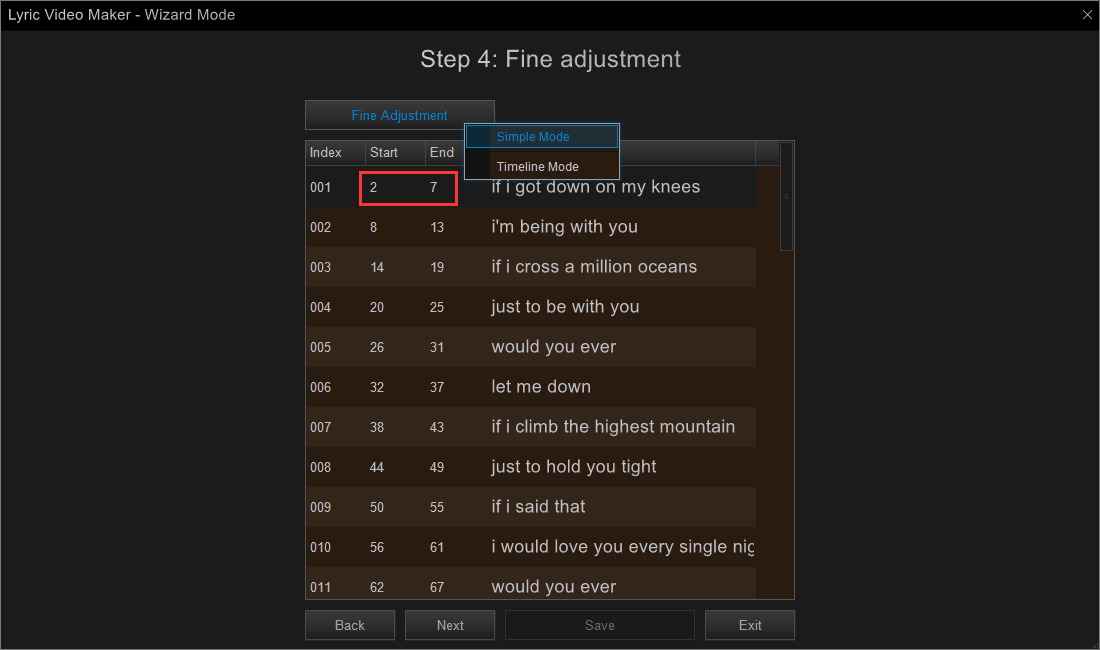
If the lyrics words and music out of sync, we can directly modify the start time and end time in the next step, Fine Adjustment.
Just manually enter the start and stop times. You can also adjust them in simple mode or timeline mode.
Step 5, select the lyrics template and font style.
After the time synchronization is finished, we need to set the style of the lyrics, which will directly determine the effect of the lyrics video.
Lyric video maker has some built-in lyrics templates. You can apply them with a click, and preview the effects with a double click. You can also set a separate font style for each lyric.
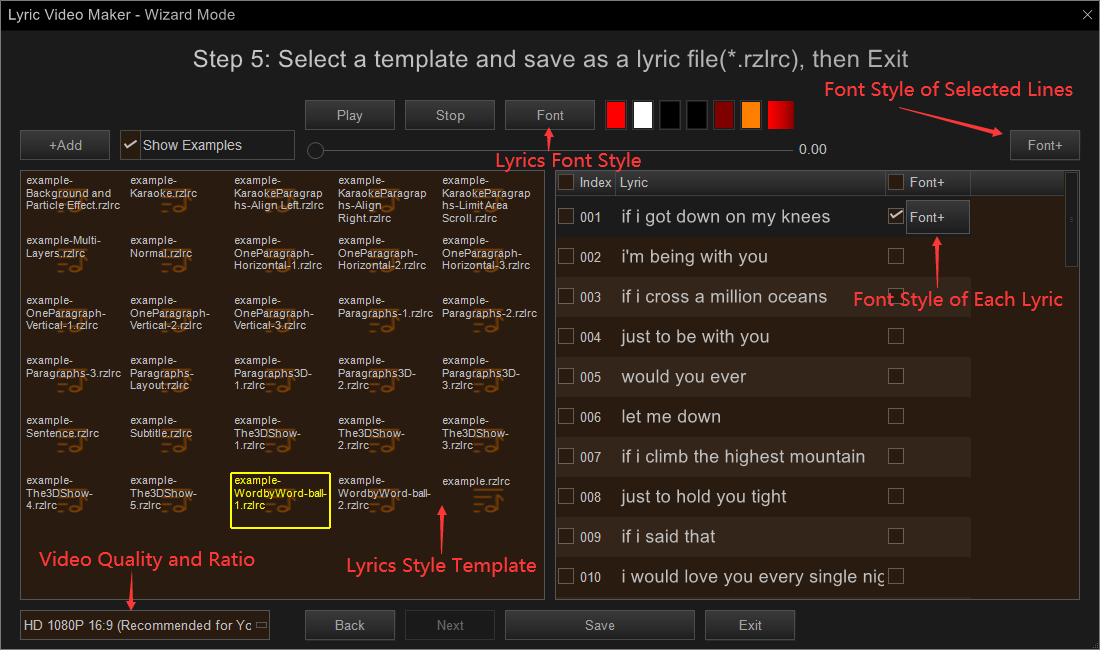
After the setup is complete, click the Play button to see if the effect is satisfied.
Step 6, output the video.
Once you’ve styled the lyrics video, you’re ready to export it. Click the Save button in step 5, to save the finished video as an *.RZLRC file.
Then click Exit to return to the home screen of YouTube Movie Maker.
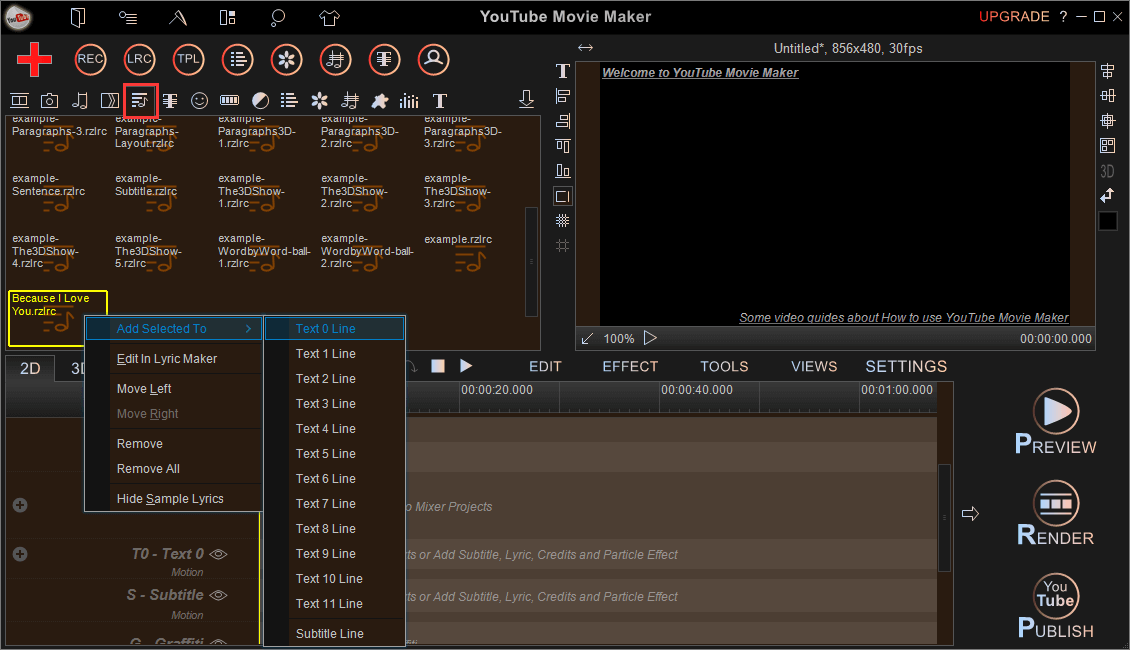
Next click the Lyric button, also find the lyrics file we saved just now. Right-click on it, select "Add Selected To >> Text 0 Line".
Click the Red Plus button, select "Add Audio", and add the prepared song to YouTube Movie Maker.
Then click the audio icon, right-click on the song you just added, and select "Add Selected To >> Audio 0 Line".
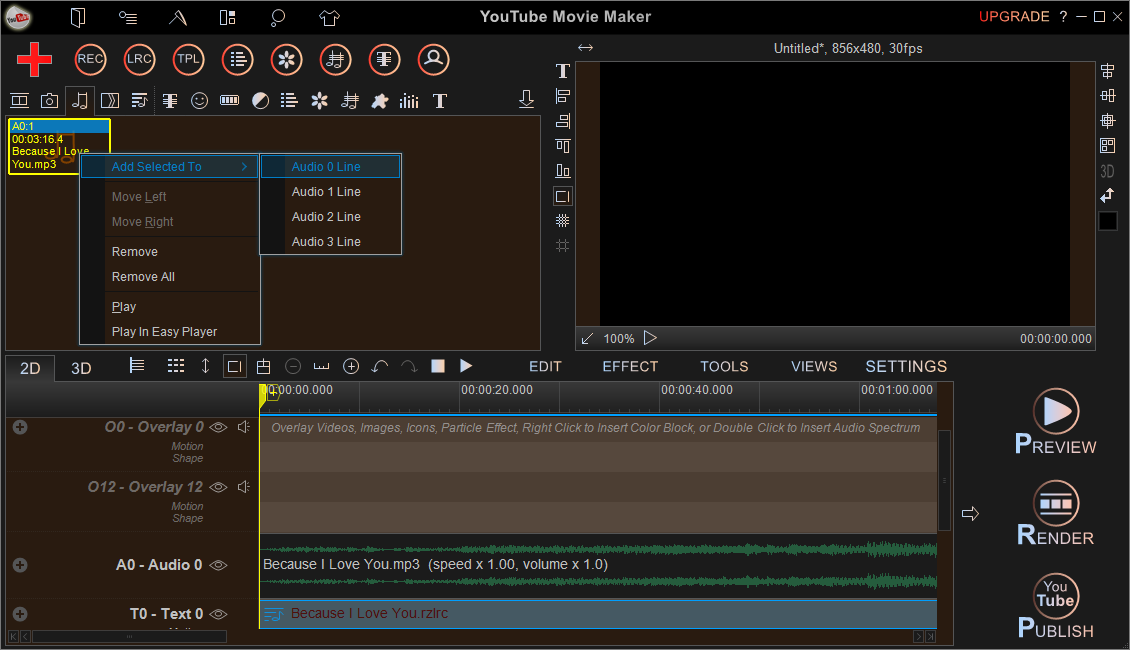
Before exporting, we can click on the Preview button and check the video again. If there are no problems, we click Render and select a location to save the video.
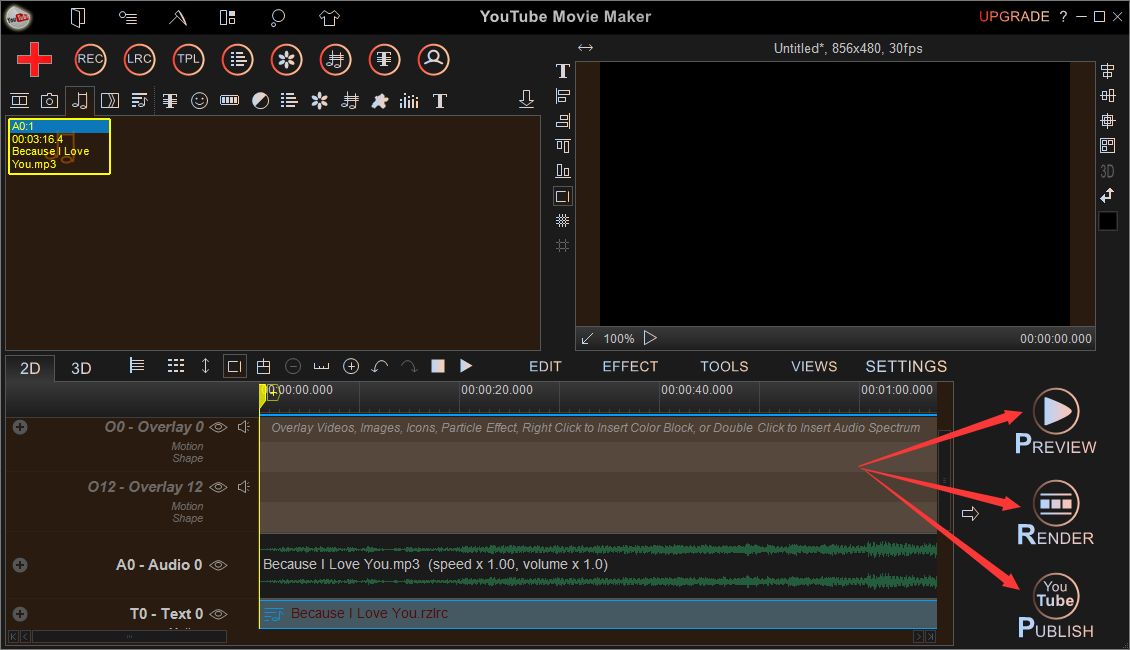
Of course, you can also click the Publish button to upload the video to YouTube directly.
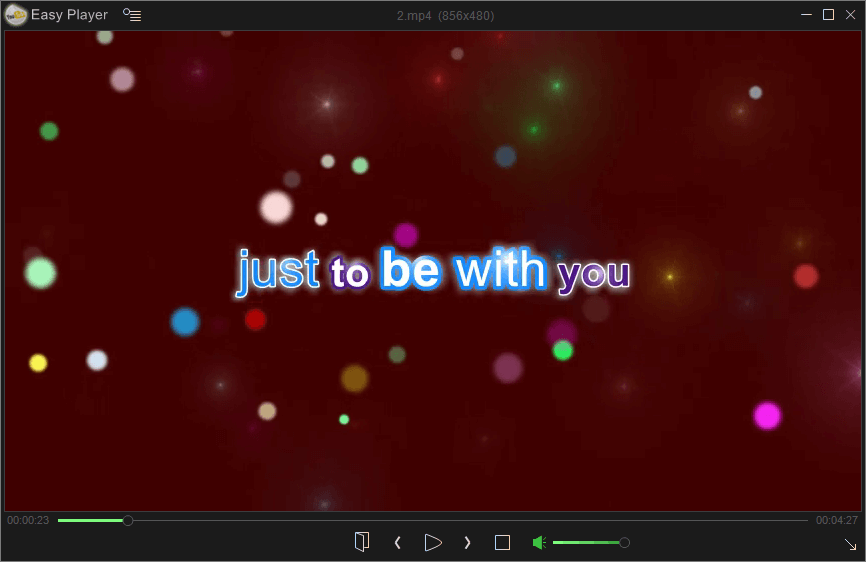
Finally, you should get a lyrics video like this (The video effect depends on the template you choose).
When you are good at YouTube Movie Maker, you can also add a variety of images, video background, and special effects for your lyrics video.
Part 2: How to make a professional lyric video in full mode
You’ve learned how to make a lyric video in Wizard Mode. If you are already familiar with YouTube Movie Maker and want to do more customization, you can use the full mode.
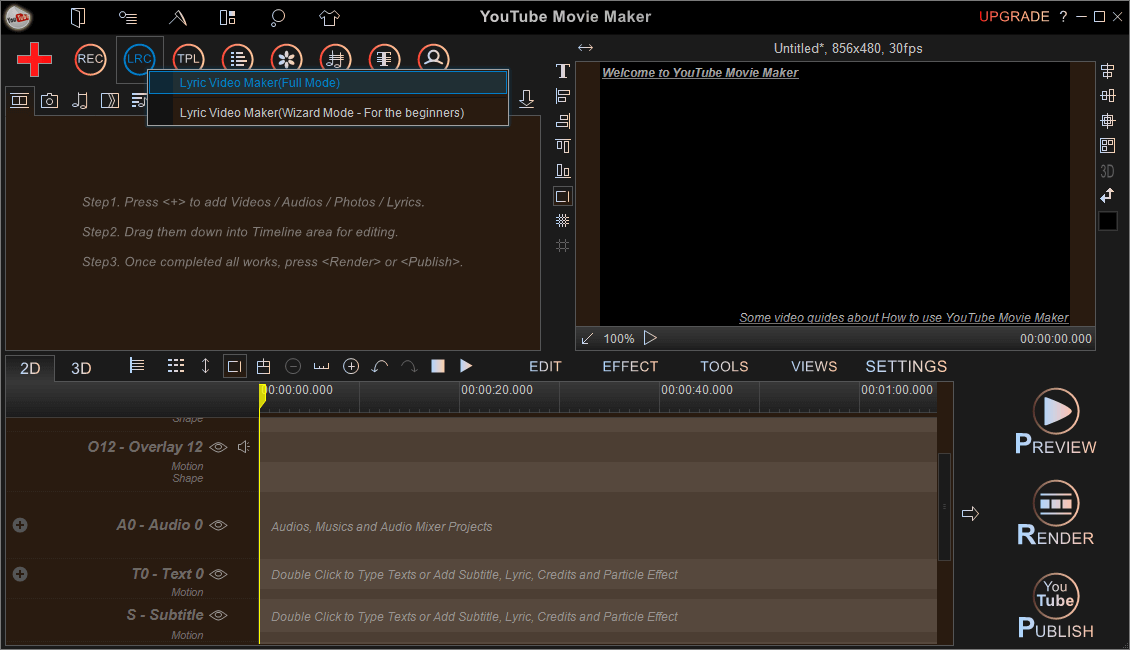
Step 1, Run the software and click Lyric Maker >> Lyric Video Maker (Full Mode).
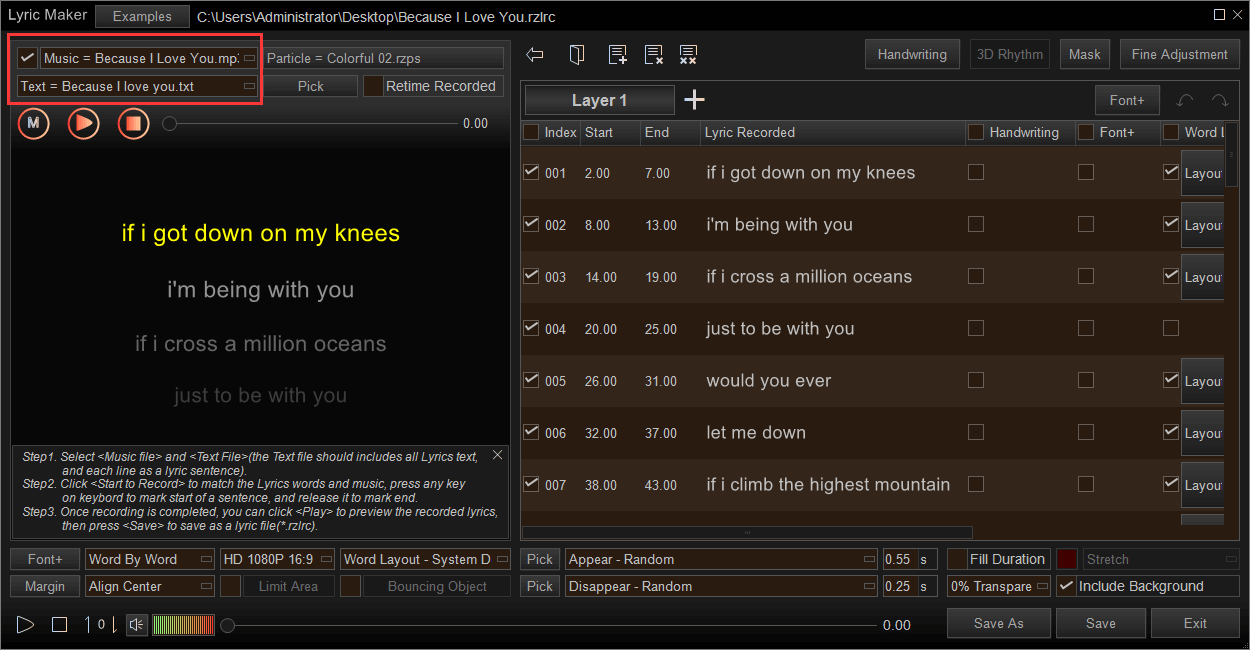
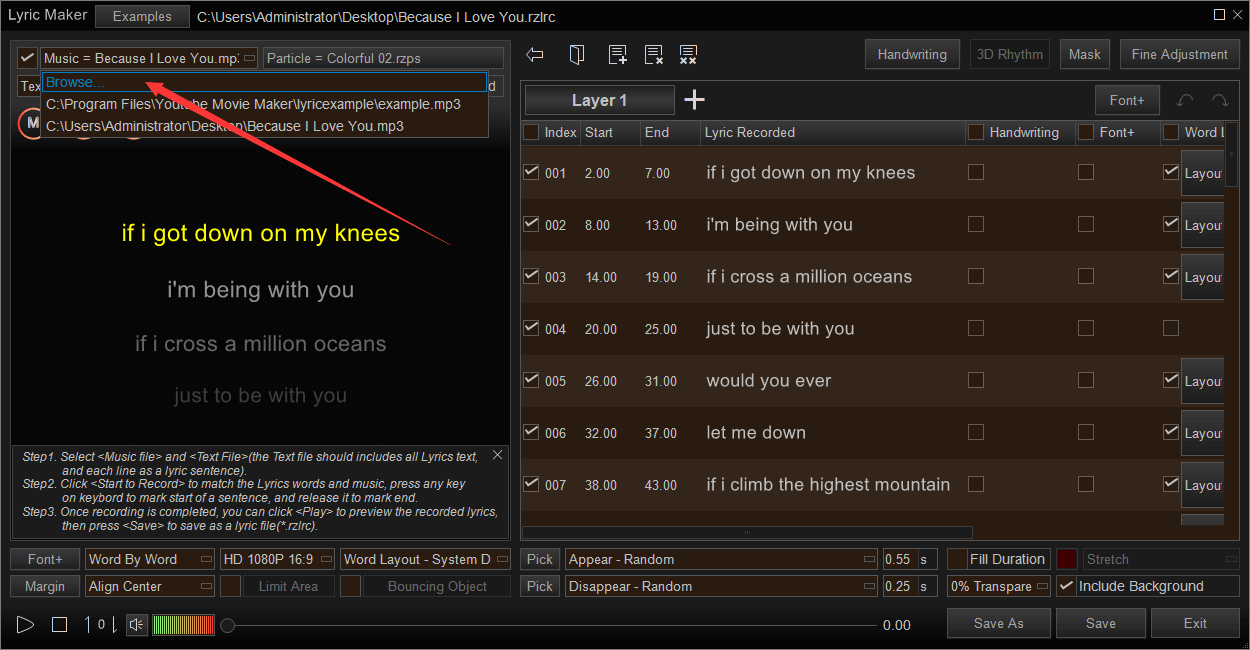
Step 2, Add the prepared *.mp3 file(music) and the *.txt file(lyrics) to the corresponding positions. It is also a separate line for each lyric.
Step 3, make the lyrics synchronize with music.
You can view all lyrics in the left list, and click the "Start to Record"button, the program will play the music.
When the music playing, we need to press any key on the keyboard to mark the start time of a lyrics sentence, don’t instantly released it. You need to keep pressing the keyboard key to the end time of this lyric sentence.
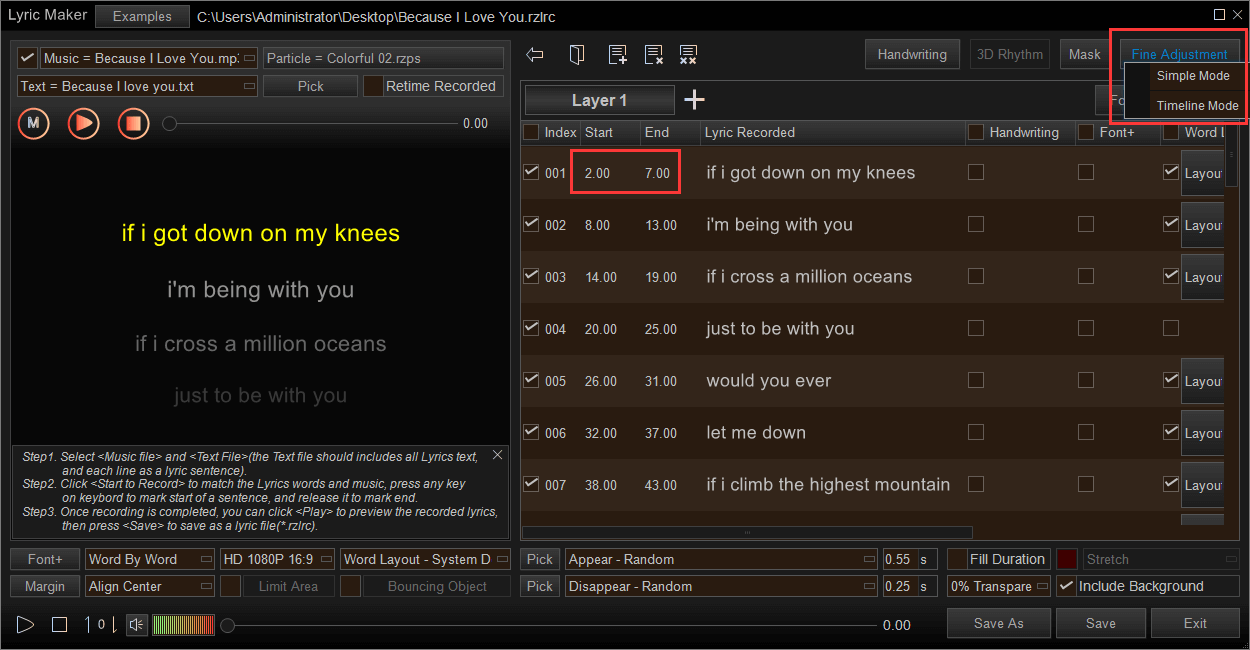
In this process, we can view all synced lyrics in the right list, and each lyrics sentence has its start time and end time.

*If the lyrics words and music out of sync, we can directly modify the start time and end time of a lyrics sentence in the right list or click the "Fine Adjustment" button to slightly adjust or insert the delay tag.
Repeat the operation until all lyrics are recorded.
Step 4, Click “Font” >> “Set to All Line”.

Add a font to the lyrics. You can change the font size, style, color, and any other parameters.
Remember to set a proper font size or the lyric may exceed the display screen.

Choose the limited area where it is displayed.

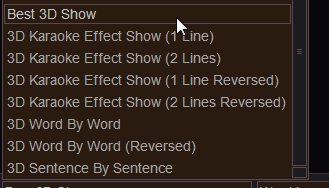
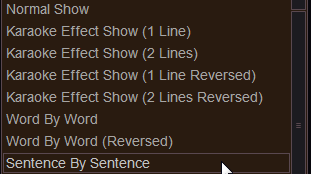
Here are many 2D/3D lyrics/karaoke video modes, we need to select one.

Please note:
1. If selected "Karaoke Effect Show", we can customize the Karaoke overlay font color, outline color, shine color, shade color, etc. and press "Margin" or "Align" to adjust the layout of lyrics.

2. If selected "Word by word", we can click "Font+" to add multiple font types, colors, sizes, angles, etc. even add a cool bouncing object(check and click "Bouncing Objectenable bouncing ball"). Or customize font+, layout and motion effect for each lyrics sentence in the right list.

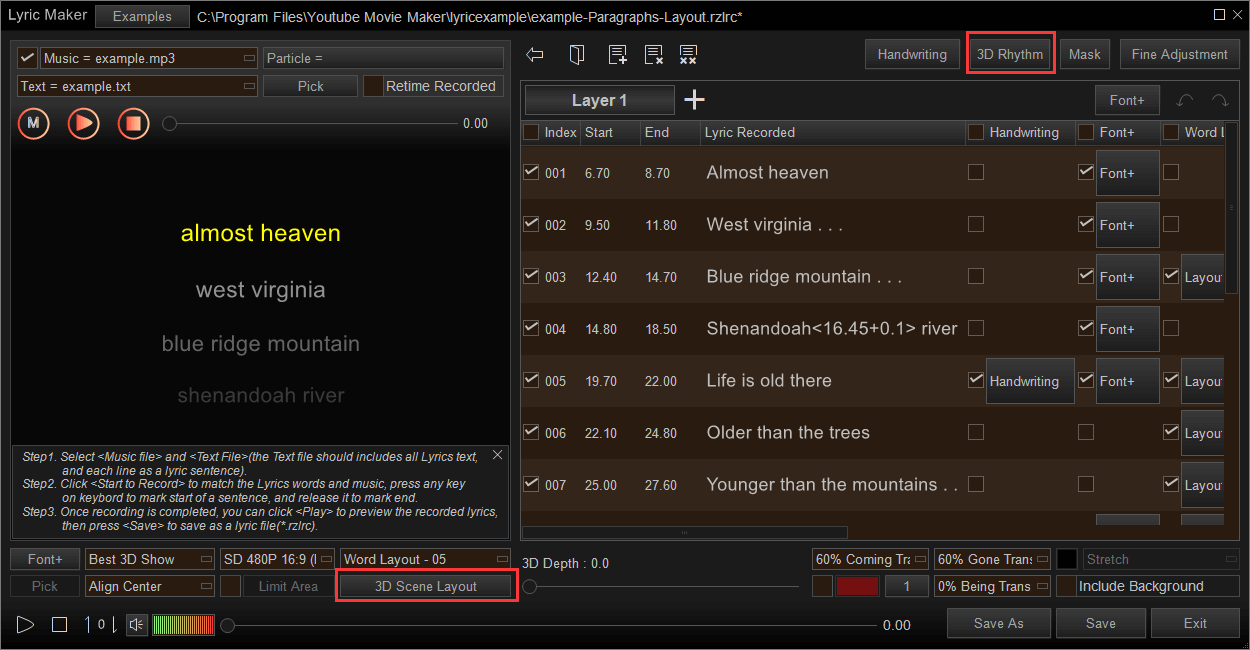
3. If selected the "Best 3D Show", we can make the cool 3D lyrics video, we can click the "3D Rhythm" button to set the 3D Rhythm frequency and type.

Step 6, Save it as a *.rzlrc file.
once completed all settings, we can click the "Save As" button to save the current lyrics project as a YouTube Movie Maker lyrics file(.rzlrc).
Click the "Exit" button to quit the Lyrics Video Maker window, then we can view the saved YouTube Movie Maker lyrics file(*.rzlrc) in the source file list, next step, we need to make the final lyrics video from this lyrics file.

Step 7, Add everything to the timeline.

Add the *.rzlrc file to the Text Line/Subtitle Line.
Add the music to the Audio Line.
Add your image/video background to the Video/Background/Overlay Line.
Please note:
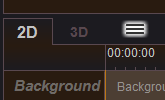
1. For making 3D Lyrics or Karaoke video, when selected "Best 3D Show", "3D Karaoke Effect Show", "3D Word By Word", "3D Sentence By Sentence" in Lyric Maker window, we must choose the "3D" tab in the Timeline area to keep all 3D Effects.

2. For making 2D Lyrics or Karaoke video, when selected "Normal Show", "Karaoke Effect Show", "Word By Word", "Sentence By Sentence" in Lyric Maker window, we need to click the "2D" tab in the Timeline area.
Step 8, Click “Preview” to see if you are satisfied.

If not, you can adjust it by clicking the lyric file in the Text Line.
And finally, you can “Render” it or “Publish to YouTube” directly.

The Final example:
If you want to make a lyric video with a cool background effect, I recommend the Pan and Zoom which are added to a static image.
If you want to know how to make a lyric video with more special effects, the tutorial of making a karaoke video may help.
If you find it is useful, welcome to share it with your friends.
Free Lyric/Karaoke Video Maker
Easily make a Lyrics Video or Karaoke Video
View more step by step video guides on YouTube